Self-Scheduling Documentation
Patient-facing booking experience built on top of Practice EHR. Two full-screen patient prototypes plus a setup screen.
Existing patient
Open prototype
- Step 1 — Phone verification
- ↪ Code verification
- Step 2 — Who is this visit for?
- ↪ Add a new patient → Scan flow
- Step 3 — Scan driver's license
- Step 4 — Reason for visit
- Step 5 — Pick a provider & time
- ↪ AI waitlist (optional)
- ↪ AI waitlist — activated
- Step 6 — Visit details
- ↪ Card on file (if enabled)
- Step 7 — Confirm visit
- Step 8 — Booking confirmed
New patient
Open prototype
- Step 1 — Phone verification
- ↪ Code verification
- Step 2 — Scan driver's license
- Step 3 — About you
- Step 4 — Reason for visit
- Step 5 — Pick a provider & time
- ↪ AI waitlist (optional)
- ↪ AI waitlist — activated
- Step 6 — Visit details
- ↪ Medical history
- ↪ Card on file (if enabled)
- Step 7 — Confirm visit
- Step 8 — Booking confirmed
AI Assist
Open prototype
Setup (Practice EHR)
Open prototype
Phone verification
Self-Scheduling / Both flows · Step 1
Key Features
- The first screen. Patient types their phone number; we text a 6-digit code.
- If the number matches a chart in the EHR, they go to Who is this visit for?. If not, they start the new-patient flow at Scan driver's license.
- Codes last 5 minutes. Tap Resend for a new one.
Field reference
Click a section to collapsePhone entry2
Phone numberInput
Auto-formats as they type. US numbers only.
SMS consentRequired checkbox
Patient agrees to receive texts before we send the code. Required by law.
Code verification2
6 code boxesInput grid
One digit per box. Cursor jumps forward. Pasting a 6-digit code works too.
Resend linkLink
Sends a new code if the first one didn't arrive.
Code verification
Self-Scheduling / Both flows · After Send code
Key Features
- Shows up after the patient taps Send code.
- Six digit boxes. Cursor moves forward as they type. Pasting the code from SMS works too.
- Code expires in 5 minutes. A live countdown sits under the boxes.
- Resend sends a new code without losing their place.
- Back link returns to the phone-entry screen for a mistyped number.
- When the 6th digit lands, the code is verified. Match → continue. No match → inline error; digits stay so they can fix one.
After a successful match: existing patients go to Who is this visit for?. New patients (no chart) go to Scan driver's license.
Field reference
Click a section to collapseHeader3
Back linkLink
Returns to phone entry. The in-flight code stays valid.
HeadlineSerif H2
"Enter the 6-digit code".
"Sent to" sub-lineStatus
Shows the phone number it was sent to, with a resend link.
Code entry2
6 digit boxesInput grid
One digit per box. Cursor moves forward; backspace moves back. Pasting a 6-digit string fills them all.
Code expires in M:SSTimer
5-minute countdown. At 0:00, boxes lock and the patient is prompted to resend.
Behavior
Verification & routing
No "Verify" button. The code is checked the moment the 6th digit is entered.
Step by step
- Patient types or pastes the digits.
- When all 6 are filled, the code is verified.
- Match: existing patient → Who is this visit for?. New patient → Scan driver's license.
- No match: inline error. Digits stay so they can fix one.
- Expired: boxes lock; a banner suggests Resend.
Privacy: The code is never logged. Only the result (success/failure) is recorded.
Scan your driver's license
Self-Scheduling / Both flows · New: Step 2 / Existing: Step 3
What this screen does
- Shows up before Reason for visit. New patients see it right after OTP (Step 2 of 7). Existing patients see it after picking the patient (Step 3 of 7).
- Tapping a "Tap to capture" slot opens the camera. The patient lines up the driver's license, takes the photo, and the image is auto-converted to a black-and-white scan. The scan is saved to the patient's documents in the EHR, and the parsed details auto-fill the new-patient form on the next screen.
- A toggle under the title lets them pick Front + Back or Front only. Default is Front + Back. Front only collapses the grid to a single slot.
- We read the license and auto-fill name, date of birth, gender, and address.
- Insurance card is captured later, on Visit details inside the Use-insurance tab.
- Also shows up when an existing patient taps "Add a new patient" on the Who screen.
- Practice-controlled. Two EHR Setup toggles decide the behavior: Scan driver's license (shows or hides the block) and Driver's license scan required (whether the scan is mandatory or skippable). A Skip for now button appears only when the scan isn't required.
Privacy: Photos are encrypted. The black-and-white scan is saved to the patient's documents; the extracted text is attached to the chart. The original color image is discarded.
Field reference
Click a section to collapseHeader2
HeadlineSerif H1
"Scan your driver's license."
Sub-lineBody
"Snap a quick photo and we'll fill in your name, date of birth, and address automatically."
Capture block2
Driver's license blockCapture pair
One centered card with a Required / Optional pill, the Front + Back / Front only toggle, and one or two slots. Each slot shows "Tap to capture", then "Reading…", then a preview with a "Captured" pill. When done: a green note reads "Identity captured — speeds up check-in."
Front + Back / Front only togglePill toggle
Two-segment pill under the card title. Defaults to Front + Back. Tapping Front only hides the back slot and clears any back capture.
Per-slot states3
EmptyDefault
Dashed ring + "Tap to capture". Tapping fires the camera (mocked here with a 900 ms delay).
CapturingIn progress
Spinner with "Reading…". Slot is locked while spinning.
DoneCaptured
Card preview with a "Captured" pill. A Retake link appears so they can re-shoot a blurry photo.
Privacy note1
Encryption blurbReassurance
Soft-gray box under the card: "Photos are encrypted and only used to read your license — we don't keep the images. You'll have a chance to scan your insurance card later, on the Visit details step."
Footer actions3
BackGhost
Returns to phone verification (new patient) or Who is this visit for? (existing patient). OTP stays valid for 5 minutes.
Skip for nowSecondary
Shown only when the scan isn't required.
ContinuePrimary
Disabled until the required side(s) are captured. On click, OCR data is attached to the booking context and the patient lands on About you with fields pre-filled.
How the scan-to-fill works
From a license photo to a pre-filled chart
Captures are mocked with a 900 ms timer in the prototype. In production:
Step by step
- Patient takes 1 or 2 photos depending on the toggle.
- Each photo is encrypted and sent to a vision model that reads the text.
- We pull first name, last name, DOB, gender, and address — these auto-fill the demographics form.
- Front-only: the back is usually just the barcode. Everything we need is on the front, so the result is the same.
- If a field looks uncertain, we still pre-fill it but flag it on About you so the patient checks.
- Insurance card is scanned later, on the Visit details step.
Privacy: The card images are not retained. Only the extracted text gets attached to the chart, and the verification result lives only with the appointment record.
Who is this visit for?
Self-Scheduling / Existing patient · Step 2
Key Features
- One phone number can be on multiple charts — e.g. a parent's phone linked to themselves and their kids.
- This screen lists every patient record sharing this phone number. Each one is its own card.
- Even if only one patient is on the number, we still show it so the user confirms who they're booking for.
Field reference
Click a section to collapsePatient cards3
NameText
Legal name from the chart.
AgeNumber
From DOB. Helps pick the right person if names are similar.
Last visit dateDate
When this patient was last seen.
Add a new patient card1
+ Book for someone elseDashed card
Sends the user into the new-patient flow, starting at Scan driver's license. The existing phone is already verified, so auth + OTP are skipped.
Book for someone else → new-patient flow
Self-Scheduling / Existing patient · Redirect
What this does
- Triggered from the "Book for someone else" card on Who is this visit for?.
- Drops the user into the new-patient flow at Scan driver's license. Insurance card is captured later, on Visit details.
- Auth + OTP are skipped — the existing patient's phone is already verified.
- Rest of the flow: Scan license → About you (pre-filled) → Reason → Provider & time → Visit details (insurance scan + eligibility + optional secondary) → Medical history → Card on file (if enabled) → Confirm.
- Replaces the old "Add a patient" modal — scanning is faster and produces a richer chart.
Why a redirect instead of a modal? A modal captures only the basics. The full flow uses a license photo for demographics, scans insurance on Visit details, runs a live eligibility check, and feeds a complete chart into the EHR — in a fraction of the typing time.
After this screen, continue from Step 3 of the New patient flow
- Step 3 — About you — demographics + address auto-filled from the driver's-license OCR; the patient just reviews and continues.
- Step 4 — Reason for visit — pick from the card list or describe in their own words; only reasons that accept new patients are shown. In-person / Telehealth toggle sits above Continue.
- Step 5 — Pick a provider & time — only providers who accept new patients appear, sorted by AI match. The Pick-a-date filter narrows by day; tapping Select on a provider expands an inline week / month time picker.
- Step 6 — Visit details — payment-method tabs (Use insurance / I'll pay out of pocket), insurance-card scan inside the Use-insurance tab, real-time eligibility check with an Enforce eligibility override, optional secondary insurance, pharmacy, and the reason-specific question.
- ↪ Medical history — allergies, meds, conditions, emergency contact.
- ↪ Card on file — compulsory when a no-show fee is set; optional otherwise.
- Step 7 — Confirm visit — the new chart is created in the EHR at this step, then the appointment is booked, an SMS + email confirmation is sent, and a calendar invite is created.
About you
Self-Scheduling / New patient · Step 3
Key Features
- Basic info for the new chart — legal name, DOB, gender (optional), email, address.
- Auto-pre-filled from the license scan on the previous step (name, DOB, gender, address, ZIP, city, state). Patient just reviews and continues.
- When the patient skipped the scan, this screen becomes their first step. The kicker changes to "Step 3 of 7 · Start here", the sub-line tells them they're starting from scratch, and the "Don't feel like typing? Scan now" banner stays on top so they can still scan their license to auto-fill if they change their mind.
- Two sections: Personal information and Address.
- On Continue, we check the EHR for an existing chart with the same name and DOB. If we find one, we ask "Are you Lena McKay?" before creating a duplicate.
- The chart isn't created yet — that happens at Confirm. Avoids empty charts from people who abandon.
- Back / Continue are pinned to the bottom; no scrolling to advance.
Field reference
Click a section to collapsePersonal information5
First nameRequired
Legal first name. Auto-focused on load.
Last nameRequired
Legal last name. No middle name field.
Date of birthRequired
Auto-formats as
MM/DD/YYYY as they type.Gender (optional)Dropdown
Female / Male / Non-binary / Other / Prefer not to say. Can be filled at check-in.
EmailRequired
Used for the appointment confirmation and patient portal access.
Address4
Street addressRequired
House number, street, and apartment in one field.
ZIPRequired
5 digits, numeric only.
CityOptional
Filled later if blank.
StateDropdown
Two-letter code. Defaults to IL for Riverbend Health.
Reason for visit
Self-Scheduling / Both flows · Step 4
Key Features
- Patient picks why they're coming in. The most important step — the reason decides which providers can see them, visit length, and whether telehealth is offered.
- Two ways to pick: search the list, or describe it in their own words and we'll guess.
- In-person / Telehealth toggle sits above Continue. Picking the mode here lets us filter the provider list later.
- Existing patients then have their provider auto-selected with the time picker already open. New patients always pick a provider.
One reason drives everything downstream: provider list, visit length, telehealth availability, and the reason-specific intake question later on.
Field reference
Click a section to collapseSearch and pick2
Search barInput
Filters the reason cards as the patient types.
Reason cardsSelectable
Icon + reason name + short symptom blurb (e.g. "Painful swallowing, redness"). Tapping selects. Visit length is set behind the scenes.
Free-text path2
"Describe in your own words"Textarea
Patient types freely; we suggest the closest matching reason.
AI suggestion bannerAI
Pops up once they've typed enough. Tapping Use that picks the suggested reason.
Visit mode1
In-person / Telehealth togglePill toggle
Two-pill toggle above Continue. Defaults to In-person. Carried forward so the provider list only shows providers who support that mode.
How the AI works
Guessing the reason from free text
We match the patient's words against a keyword list for each reason and pick the closest one.
Step by step
- Compare what the patient typed against the keyword list for every reason.
- Each match adds points. Longer keywords score more (so "blood pressure" beats "bp").
- The highest-scoring reason wins and is suggested.
- Patient can ignore the suggestion and pick something else.
Example
Patient types "I've had a headache for three days." We match "headache" and suggest Sinus or headache.
Privacy: Free text never leaves the device unless they continue. Only the final reason is saved.
Pick a provider & time
Self-Scheduling / Both flows · Step 5
Key Features
- Pick-a-date filter. Calendar pill in the filter row opens a popover. Selecting a day filters the list to providers with openings that day. After picking a provider, the inline time picker jumps to that date and auto-selects the AI-suggested slot — 2 taps to book.
- Inline time picker. Tapping Select expands the card with an animated slide-down. No new page.
- Collapsible. Select button flips to Close with an up chevron. Tap to collapse, or tap a different provider to switch.
- Existing patients land with their provider already expanded and the time picker open — one tap to book.
- Week / Month tabs in the expansion. Week = next 14 days. Month = compact calendar grid; navigate forward/back to book further out.
- AI-suggested slot — the best opening gets a sparkle on its time button and a "Suggested: HH:MM" chip in the expansion header.
- "None of these times work?" card at the bottom links to the AI Waitlist.
- New patients see only providers who accept new patients, sorted by AI match.
Field reference
Click a section to collapseFilters6
Specialty dropdownDropdown
Default Any. Picking a specialty narrows the list.
All providersChip
Default chip. Shows every eligible provider after other filters.
Available soonChip
Providers with the earliest openings.
TelehealthChip
Providers who support telehealth for this reason.
Pick a dateDate popover
Calendar pill that opens a popover with a month grid and prev/next arrows. Past days and weekends are disabled. Picking a day filters the list. After a provider is picked, the inline picker jumps to that day and auto-selects the AI-suggested slot.
Show same dayPurple button
Filters to providers with availability today.
Sort1
Sort byDropdown
Default AI match. Switch to Earliest for soonest-opening order.
Provider card (collapsed)6
Avatar & nameIdentity
Photo and full name with credentials.
RoleText
e.g. Family Medicine, MD.
Telehealth pillPill
Shown when the provider supports televisits.
AI match %AI
A percentage. 90%+ gets a purple-teal pill with a short reason like "Has seen you 3× this year."
Next availableDate
Soonest open slot for this provider.
Select / Close buttonAction
Tapping Select expands the card inline with the time picker. The button flips to Close while open.
Provider card (expanded — inline picker)7
Week / Month tabsPill tabs
Top-left of the expansion. Week = next 14 days. Month = full calendar with prev/next arrows.
AI Suggested chipAI
Top-right pill. Reads "Suggested: 8:00 am" — the AI's pick of the best opening on the active day. The matching time button gets a small sparkle.
Week stripDay picker
14 day chips. Each shows day-of-week, date, and "X open" / "Full". Selected day is blue. Full days are disabled.
Month gridCalendar
Compact 7-column month grid centered in the card. Each cell is a near-square button. Active day is a filled blue rounded square; available days have a green dot; weekends are muted; past days are faded. Prev / Next arrows switch months.
Selected-day headerHeading
Between the calendar and the slot grid. Left: "Fri, May 1". Right: "9 times available".
Slot gridTime buttons
Open slots grouped into Morning and Afternoon with counts. Picked slot turns solid blue. Tapping fills the booking context.
"None of these times work?" CTAWaitlist link
A soft card at the bottom: "Tell us when you're free and the AI Waitlist will book the first matching opening — usually within a day or two." Routes to the waitlist with the provider locked in.
How the AI works
What the AI match percentage means
A "fit score" for the patient's reason, based on specialty, past visits, and practice rules.
Step by step
- Start with the provider's reason allow-list.
- + points if they're the patient's usual provider.
- + points if they're known to be strong at this kind of visit.
- Result is shown as a percentage. 90%+ gets a purple-teal pill.
- A short reason sits below the score — e.g. "Has seen you 3× this year."
AI waitlist
Self-Scheduling / Both flows · Optional
Key Features
- When nothing fits, the patient tells us when they're free.
- Two preferred times (1st and 2nd choice). Each watches for openings within a 30-minute window.
- We watch the calendar 24/7 and book them the moment something opens — usually 1–2 days as cancellations happen.
- Live forecast percentage shows their booking odds. More flexibility = higher odds.
- Fallback providers: watch other clinicians who can handle the reason, not just the first choice.
Field reference
Click a section to collapseWindow4
Date range buttonsChoice
This week / 2 weeks / a month. Wider range = better odds.
Preferred time · 1st choiceTime
Primary target time. We watch for openings ± 30 minutes (e.g. 9:00 AM matches 8:30 to 9:30).
Preferred time · 2nd choiceTime
Backup time. Same ± 30-minute window.
Days of the weekMulti-select
Which days work. Defaults M–F; weekends if the practice is open then.
How to reach you1
Notification optionsRequired
Text, email, or phone. At least one required.
Forecast card5
% chance of bookingAI
Big number on the right — e.g. "63% chance of booking within 14 days." Means: out of 100 people in this situation, this many would get a slot. Updates live as the patient widens dates, adds times, picks more days, or turns on fallback providers. Higher = more likely to book.
Position in queueStat
How many people are ahead of this patient on the waitlist — same provider, overlapping days/times. First come, first served.
Median wait timeStat
How long the typical similar patient waited. Based on the last 90 days of waitlist entries with the same provider, reason, and window length. Half waited less, half waited longer.
Slots opened last weekStat
How many slots on this provider's calendar opened up in the last 7 days — from cancellations, reschedules, or new availability. More = more booking chances. Mocked at 14.
Cancellation rateStat
Daily chance a booked slot frees up. Calculated from the last 30 days: cancelled appointments ÷ total booked, then ÷ 30. Shown as "~9% per day". Higher = more openings.
How the AI works
Calculating the booking odds
We combine flexibility on dates, times, and days, plus a bonus for fallback providers.
Step by step
- Wider date range = higher odds (month beats week).
- More acceptable times = higher odds (2 times beat 1).
- More days selected = higher odds (M–F beats just Tuesday).
- Fallback providers add an 8% bonus.
- The forecast updates live as the patient changes their answers.
Picking who gets the slot
When a cancellation happens
Multiple patients may want the freed slot. We rank and offer it to the best match first.
Step by step
- Narrow to patients whose preferences fit the open slot (day, time, provider).
- Rank by urgency of the reason, how long they've waited, and how well the slot fits.
- Top match gets the offer with a 15-minute window to accept.
- If they decline or don't respond, the next person gets it.
AI waitlist — activated
Self-Scheduling / Both flows · After Activate
Key Features
- Shows up the moment the patient taps Activate AI Waitlist.
- Tone shifts — centered layout, pulsing AI orb, big serif headline. The AI is working for them now.
- Confirms the provider by name (e.g. "We're watching Dr. A. Aleem's schedule").
- Shows estimated booking window, confidence bar, and position in line.
- Done returns to home. From here on, the system watches the calendar 24/7 and texts the patient when a slot opens.
Copy: "Most patients with these preferences are booked within 5 days. We'll text you the moment we lock in a time — keep it or skip with one tap."
Field reference
Click a section to collapseHero3
Pulsing AI orbVisual
72 px iridescent orb with a slow pulse. Signals the AI is active.
"Active" pillStatus
Purple-teal pill above the headline. Confirms the waitlist is live.
HeadlineSerif H1
"You're on the AI Waitlist. We're watching Dr. A. Aleem's schedule."
Reassurance copy1
Sub-paragraphBody
Explains what happens next: when to expect a booking and that they can keep or skip the slot with one tap.
Forecast card4
Estimated bookingRange
A day range (e.g. 2–5 days). 25th–75th percentile of the median wait time for similar past entries.
Confidence barAI
Gradient bar filled to the forecast percentage. Same number from the setup screen.
% confidence labelStat
Mirrors the bar's fill (e.g. 63% confidence). Same formula as the setup forecast.
Patients ahead of youStat
Same Position-in-queue metric from setup. Mocked at 3.
Action1
DonePrimary
Returns to home. The waitlist is already saved.
What happens next
After Done
The waitlist runs in the background. The patient can close the tab.
Step by step
- System watches the provider's calendar continuously.
- When a matching slot opens, the patient gets an SMS (and email if enabled) with one-tap accept/skip.
- Slot is held for 15 minutes. Skip or no-response → next person in line gets it.
- Accepted = appointment auto-booked, confirmation sent, calendar invite created.
Visit details
Self-Scheduling / Both flows · Step 6
Key Features
- Last few questions before Confirm. Most fields are pre-filled — patient just reviews.
- Two payment tabs: Use insurance and I'll pay out of pocket. Self-pay hides the insurance fields and shows the cash price. If the practice takes only one method, the choice is hidden.
- Insurance card scan sits inside the Use-insurance tab, above the Insurance + Member ID fields. Capturing the front auto-fills both fields.
- Real-time eligibility check. After the card is scanned (or fields are edited), we verify with the payer. A status banner shows: "Verifying…" → "Coverage verified" (green) or "Couldn't verify coverage" (red).
- Enforce eligibility button appears in the red banner. Tapping it overrides the rejection so the patient can keep booking. Front desk re-runs the check at check-in.
- + Add secondary insurance dashed button below the primary section. Expanding reveals another scan block + payer / member ID fields. For dual coverage. A Remove link collapses it back.
- Voice mode is available so the patient doesn't have to type.
Field reference
Click a section to collapseTop banner1
Voice mode bannerToggle
Switches the page into "speak naturally" mode for patients who don't want to type.
Payment7
Use insurance / I'll pay out of pocketTab pair
Two cards. Self-pay hides the insurance fields, scan block, verification banner, and secondary-insurance button. Use insurance shows them all.
Insurance card scan blockCapture pair
Only in the Use-insurance tab, and only when Scan insurance card is on in setup. Required / Optional pill, Front + Back / Front only toggle, capture slots. Capturing the front auto-fills the Insurance + Member ID fields and kicks off the eligibility check.
Insurance fieldsInputs
Payer name + member ID. Pre-filled from the chart; refreshed from OCR after a scan. Editing re-triggers verification.
Verification bannerStatus
Sits under the insurance fields. Three states: Pending (gray, spinner) → Verified (green) or Couldn't verify (red with Enforce eligibility button). Hidden until verification is triggered.
Enforce eligibilityOverride
Inside the red banner. Overrides the payer rejection so the patient can keep booking. Front desk re-runs the check at check-in.
+ Add secondary insuranceToggle
Dashed button below the primary section. Expands a secondary section with its own scan block, payer + member ID fields, and a Remove link. For dual coverage. Billed primary first, then secondary.
Continue gatePrimary
If Insurance card scan required is on and the patient is on Use-insurance, Continue stays disabled until the primary card is captured. Self-pay patients aren't blocked.
Practical bits2
Pharmacy fieldSearch
Preferred pharmacy. Pre-filled from the chart.
Reason-specific questionTextarea
Adapts to the reason — "What's bothering you most?" for sick visits, "Anything to focus on?" for annuals, etc.
Medical history
Self-Scheduling / New patient · Step 6
Key Features
- Short health background that pre-fills the new chart so the first visit isn't spent on paperwork.
- Everything is optional. Anything skipped gets flagged for the front desk to ask at check-in.
- Free text for allergies and meds is parsed into structured chart entries on Continue (see AI block).
Field reference
Click a section to collapseFree-text fields2
AllergiesTextarea
One allergy per line. We turn the words into structured allergy entries before saving.
Current medicationsTextarea
One per line. Future versions will look up each drug in a database to attach the right code.
Quick picks2
Conditions checklistMulti-select
Common chronic conditions (diabetes, asthma, etc.) as quick checkboxes.
PharmacySearch
Search-as-you-type for the patient's preferred pharmacy.
How the AI works
Turning typed-in allergies and meds into chart entries
"Peanuts" in the allergies box becomes a structured allergy entry the rest of the EHR can use.
Step by step
- On Continue, the free text is sent to a parser.
- It picks out drug names, dosages, and frequency.
- Each one is matched against our medical reference list and gets the right code.
- Anything we can't parse stays as plain text with a "needs review" flag for the clinician.
Card on file
Self-Scheduling / Both flows · Step 6 sub-step
Key Features
- Sits right before Confirm. Collects card details for the appointment.
- Required when a no-show fee is set. If Late-cancel / no-show fee in EHR Setup is > $0, the form is mandatory — no Skip, Continue stays disabled until the four fields are valid. The header pill turns red.
- Optional otherwise. If the fee is $0, the step still appears but with an Optional label and a "Skip for now" button.
- Card fields auto-format: number is spaced into 4-digit groups, expiry to
MM / YY. - Toggled from EHR Setup via the Collect card on file switch. Off = step is skipped, patient goes straight to Confirm.
- "Secured by Stripe" pill in the form header. The practice never sees the raw card number.
No-show fee ⇒ required card. A non-zero fee locks this step: no Skip, Continue stays disabled until the card is valid. We only charge if the patient actually no-shows or cancels late.
Field reference
Click a section to collapseHeader3
KickerEyebrow
"Almost there".
HeadlineSerif H1
"Add a card on file."
Sub-lineBody
Adapts to setup. Required: "<Practice> charges a $<fee> fee for late cancellations and no-shows. We'll only charge if you miss the appointment without rescheduling." Optional: "We'll keep this card on file to speed up check-in. You can skip if you'd rather pay at the front desk."
Form header2
Required / Optional pillStatus
Red Required when the no-show fee is > $0; grey Optional otherwise.
"Secured by Stripe" pillPill
Top-right of the header. The card vault is held by Stripe — the practice never sees the raw number.
Card form4
Card numberNumeric
Auto-spaced into 4-digit groups. Up to 16 digits.
ExpiryMM / YY
Auto-inserts
/ after two digits.CVCNumeric
3 or 4 digits.
ZIPPostal
Billing ZIP / postal code.
Reassurance note1
Inline noteReassurance
Red box (required) or soft-grey (optional) explaining the no-show charge or the encryption / Stripe vault.
Footer actions3
BackGhost
Returns to Medical history (new patient) or Visit details (existing).
Skip for nowSecondary
Hidden when the no-show fee is > $0.
ContinuePrimary
Disabled until all four card fields are valid. On click, lands on Confirm.
Confirm visit
Self-Scheduling / Both flows · Step 7
Key Features
- Summary — provider, time, location, mode, reason, insurance, price. One tap to lock it in.
- The slot is held for 5 minutes from when they picked it. If they take too long, they're sent back to pick a new time.
- For new patients, the chart is created in the EHR at this step, right before the appointment is booked.
- Confirm books the appointment, sends an SMS + email, and creates a calendar invite.
Field reference
Click a section to collapseSummary card1
Summary cardRead-only
List of everything they picked. Read-only — to change anything they have to go back.
Price & verification2
Price lineCalculated
Either the cash-pay price or the estimated copay. Sits next to the green Verified badge.
Insurance verification badgeStatus
Always reads Verified by the time the patient reaches this screen. Verification + retry happen on Visit details; if the payer rejected the check, the patient already fixed the member ID or tapped Enforce eligibility there. So Confirm has only one state: a green checkmark pill.
Policy1
Cancellation policyText
Plain-language reminder of how far in advance they can cancel without a fee. Pulled from EHR setup.
Confirm action1
Confirm buttonPrimary
Books the appointment, sends SMS + email, creates the calendar invite.
Booking confirmed
Self-Scheduling / Both flows · Step 8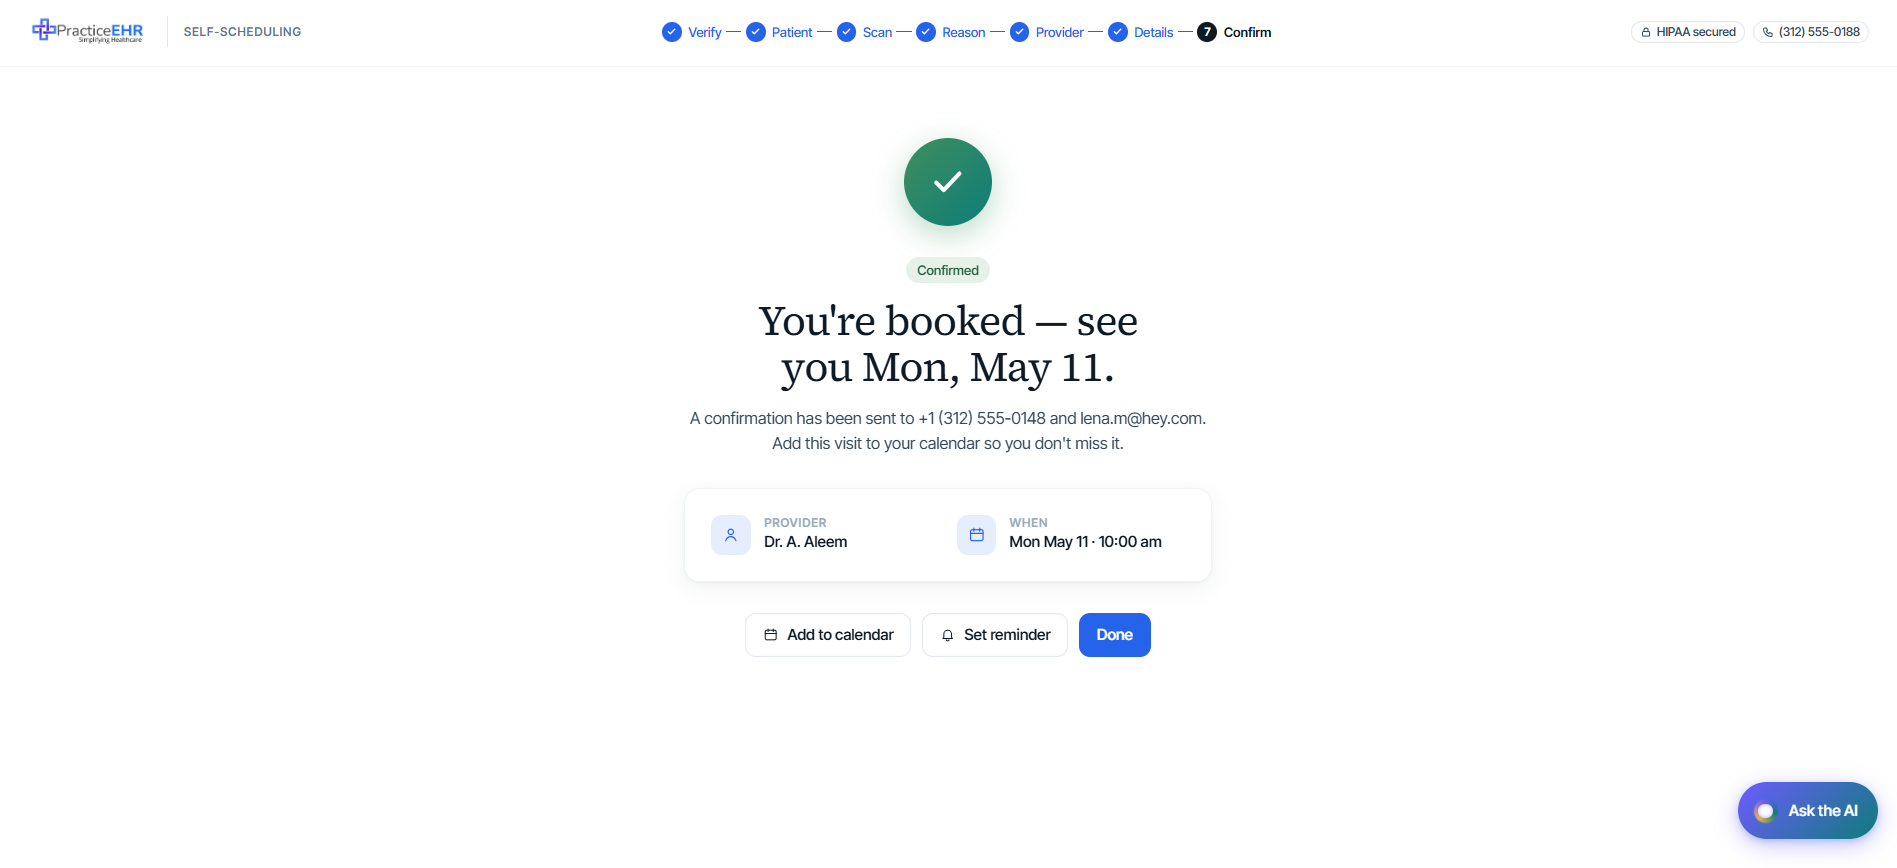
Key Features
- Success state — high-visibility green checkmark and "Confirmed" badge to reassure the patient.
- Visit summary — compact card showing the provider and confirmed time.
- Multi-channel confirmation — explicitly mentions that details were sent via SMS and email.
- Retention actions — "Add to calendar" and "Set reminder" keep the appointment top-of-mind and reduce no-shows.
Field reference
Click a section to collapseMain actions3
Add to calendarModal
Opens the calendar selection modal. Supports Google, Apple, Outlook, and generic .ics downloads.
Set reminderModal
Opens the reminder settings modal. Patients can toggle SMS/Email channels and pick timing (2 days, 24 hours, or 2 hours before).
DonePrimary
Returns the patient to the start of the booking flow (entry screen).
Calendar Modal4
Google CalendarCloud
Direct Oauth-based connection to add the event.
Apple CalendarFile
Downloads an .ics file configured for iCal.
Outlook / 365Cloud
Connects to Microsoft account to sync the visit.
Download .icsGeneric
Standard calendar file compatible with all modern apps.
Reminders Modal2
ChannelsMulti-select
Choose between SMS and Email. Defaults to both.
TimingMulti-select
Select one or more: 2 days before, 24 hours before, or 2 hours before.
AI Assist
Self-Scheduling / Available on every step
What it is
- A helpful chatbot that lives on every booking screen. Patients tap the purple "Ask the AI" button in the bottom-right corner to open it.
- It knows where the patient is in the flow and what they've already picked. The opening message changes based on the screen — on the Reason screen it asks "Tell me a bit about why you're coming in"; on the Confirm screen it offers "Want me to send a calendar invite or set a reminder?".
- Patients can type, paste, or speak — the mic icon turns on voice input.
- Replies come back in plain English with action buttons attached. Tapping a button does the work for the patient — Book 2:40 pm, Add me to the waitlist, etc.
- Also shows up as inline AI suggestions — small purple-teal banners at the top of certain screens (Provider, Slots, etc.) explaining what the AI did and offering a one-tap next action.
- Turned on or off from a single EHR Setup toggle: AI assistant on booking page.
Why it helps: patients don't have to learn the booking flow. They can ask the same questions they'd ask a front-desk receptionist — "I need a same-day visit", "Why was this provider recommended?", "Can I bring my kids?" — and get a clear answer or a one-tap action instead of digging through menus.
Field reference
Click a section to collapseFloating launcher2
Ask the AI buttonFloating
Pinned to the bottom-right of every screen (except Verify and the entry screen). Purple-teal gradient pill with a small AI orb. Tap to open the chat panel.
Show / hideSetup-controlled
Controlled by the AI assistant on booking page toggle in EHR Setup. Off = the button is hidden site-wide.
Chat panel4
HeaderIdentity
Pulsing AI orb + "Scheduling Assistant" title + green dot + "Online · <Practice>". Close button on the right.
Context-aware openerAI
First message changes based on the current step. Each screen has its own intro line (Reason, Provider, Slots, Waitlist, Intake, Confirm) so the AI sounds like it's actually paying attention.
Message threadBubbles
Patient bubbles on the right (dark), AI bubbles on the left (soft gray with the orb). Auto-scrolls to the newest message.
Thinking indicatorAnimation
Three dots pulse in sequence while the AI "thinks". Shows up for ~1 second before each reply.
Input row3
Text fieldInput
Placeholder reads "Ask anything…". Press Enter to send.
Mic buttonVoice
Inside the text field. Tap to start voice input — the AI transcribes and sends like a normal message.
Send buttonPrimary
Purple-teal gradient when the field has text; grey when empty.
Quick prompts4
First-time prompt chipsChips
Shown only on the first open of the panel, above the input row. Four small pills the patient can tap instead of typing:
"I need a same-day visit"Quick prompt
Triggers a reply about same-day openings with two action buttons (book or see all).
"Best time for a physical?"Quick prompt
Returns the earliest annual-physical opening + an offer to waitlist.
"Why was this provider recommended?"Quick prompt
Explains the AI match in 3 reasons (reason fit, availability fit, location / visit-type fit).
Action shortcuts3
Book buttonsAction
Attached to AI replies that suggest a time. One tap routes to the time picker with that slot pre-selected.
"Add me to the waitlist"Action
Routes to the AI Waitlist setup screen with the current provider locked in.
"See all today"Action
Filters the provider list to same-day availability and closes the chat panel.
Inline AI suggestions2
Banner cardInline
A soft purple-teal banner that sits at the top of a screen. Includes a small AI orb, a one-line explanation (e.g. "I ranked these based on your annual-exam reason and how each provider matches it."), and optionally an action button (e.g. Show same-day only).
DismissClose
Small × on the right of the banner. Dismisses it for the rest of the booking.
What the AI can answer
Six common patient questions, handled in chat
The mock here uses heuristic matching on a few keywords. In production this is an LLM grounded on the patient's chart, the practice's schedule, and the booking-flow context.
Patterns the prototype already handles
- "Same-day / today / sick" → suggests today's openings with one-tap booking.
- "Physical / annual" → returns the earliest annual-exam slot or offers the waitlist.
- "Why this provider / why recommended" → explains the AI match in plain English.
- "How does the waitlist work" → walks through the 24/7 watch + SMS confirmation flow.
- "Cancel / reschedule" → points the patient to their dashboard.
- Anything else → "Got it. Tell me a date range and I'll find the best matches." — falls back to a polite catch-all so the conversation never dead-ends.
Privacy: No chat history is saved unless the patient ends up booking. Voice transcripts stay on the device until they tap Send.
Where the AI shows up
Two surfaces, same brain
The chat panel is the conversational surface. Inline banners are the proactive surface.
Side-by-side
- Chat panel — the patient asks; the AI answers. Best for open questions ("Can I bring my kids?", "What if I'm running late?").
- Inline banner — the AI volunteers a tip without being asked. Best for explanations ("I ranked these by AI match because…") and proactive offers ("No openings match your filters — should I waitlist you?").
Self-Scheduling configuration
Practice EHR / Setup › Self-Scheduling
Key Features
- Inside the live Practice EHR shell — same top nav, sidebar, and patient search.
- Lives at Setup › Scheduling › Self-Scheduling.
- Two columns: Practice info / Booking rules on the left; Payment methods / Patient intake / AI features / Branding on the right.
- Sticky header with a Save Changes pill and a settings gear.
- Follows the PEHR design system — 14 px labels, 40 px inputs, standard toggle.
Field reference
Click a section to collapseEHR shell3
Top navPersistent
Practice EHR logo + Home / Patients / Scheduling / Billing / Reports / AI / Setup (active).
Left sidebarCategories
Administration, Billing, Clinical, Scheduling, Others.
BreadcrumbPath
Setup › Scheduling › Self-Scheduling.
Page header2
Save ChangesPrimary pill
Blue pill, single primary action. No Cancel button (matches PEHR setup pattern).
Page settings (gear)Icon button
Standard PEHR settings icon next to Save Changes.
Practice Information4
Practice LogoUpload
The logo shown on the booking site. Drag-and-drop or click to browse. PNG / JPG / SVG up to 1 MB. Auto-generated monogram if blank.
Practice NameRequired
The name patients see — booking site heading, tab title, footer, confirmation texts and emails. Displays a tooltip on hover.
Support PhonePhone
Phone shown in the booking footer. Displays an information tooltip on hover.
Support EmailEmail
Email shown in the booking footer and confirmation emails. Displays an information tooltip on hover.
Booking Rules6
Accept new patientsToggle
Off = only existing charts can book; unknown numbers see the support phone.
Allow telehealth visitsToggle
Off = In-person / Telehealth toggle on Reason is hidden, every visit is in-person, and the Telehealth provider filter disappears.
Booking windowDropdown
How far ahead patients can schedule: 7, 14, 30, 60, or 90 days. Default 14.
Cancel/reschedule cutoffDropdown
Deadline for a fee-free cancellation: 2, 4, 12, 24, or 48 hours. Default 24.
Late-cancel / no-show feeCurrency
Dollar amount charged for late cancellations or no-shows. Shown in the cancellation policy on Confirm. Set to $0 to skip the fee. Any value > $0 also makes the Card-on-file step compulsory.
Collect card on fileToggle
On = Card-on-file step appears between Visit details and Confirm. Off = step is skipped. Compulsory (no Skip) when the no-show fee is > $0. Optional with a $0 fee.
Payment Methods3
Accept insuranceToggle
On = new patients enter payer / member ID and we run an eligibility check; existing patients see their saved coverage. Off = insurance path is hidden everywhere.
Accept self-pay (cash)Toggle
On = patients see "I'll pay out of pocket" with a flat price. If both this and Accept insurance are off, scheduling is blocked.
Self-pay visit priceConditional
Flat price for cash-pay patients. Only visible when Accept self-pay is on. Shown on Confirm.
Patient Intake4
Scan insurance cardToggle
On = scan block appears in the Use-insurance tab on Visit details. Displays an info tooltip.
Insurance card scan requiredConditional toggle
Only visible when Scan insurance card is on. On = Continue on Visit details stays disabled until the card is captured.
Scan driver's licenseToggle
On = license scan block on the Scan-cards step. Auto-fills demographics. Displays an info tooltip.
Driver's license scan requiredConditional toggle
Only visible when Scan driver's license is on. On = license must be captured to continue.
AI Features2
AI assistant on booking pageToggle
Floating "Ask the AI" helper. On = patients can ask in plain English. Off = hidden site-wide.
Smart waitlist routingToggle
On = patients can join the AI Waitlist; cancelled slots are auto-offered to the best match. Off = the link is hidden and the no-slots message becomes "call us".
Branding2
Practice LogoFile upload
Same logo as Practice Information. Recommended 300×300 px. PNG, JPG, BMP, TIFF, DOCX.
ColorColor bar
The one brand color used across the booking site. Tap to open the color picker. Drives:
- Primary buttons (Send code, Continue, Confirm visit, etc.)
- Active step indicator in the top nav.
- Focus ring on form fields.
- Selected-state ring on radio cards.
- Inline links (Change provider, resend, etc.)
- Logo monogram color when no logo is uploaded.
#3377FF (Practice EHR Blue).
Feature-flag behavior
What turning each switch off does
Toggles take effect instantly on the patient site. Turning a switch off doesn't delete data — it hides the corresponding UI.
Step by step
- Scan insurance card off → insurance scan block on Visit details is hidden; patient types payer + member ID manually.
- Scan driver's license off → Scan-cards step is skipped.
- AI assistant off → floating helper is hidden site-wide.
- Smart waitlist routing off → "Add to AI waitlist" link disappears; no-slots message becomes "call us"; auto-booking stops.
- Collect card on file off → Card-on-file step is skipped. Note: with a no-show fee > $0, leaving this off means no card to charge.
- Late-cancel / no-show fee > $0 → Skip button on Card-on-file is hidden; Continue stays disabled until a card is valid.
- All effects are instant — no reload needed.